
How To Install Versacork Mosaic
Versacork MOSAIC is relatively easy to install, much like any other ‘mosaic’ or tile product. If this is up your alley, give it a go. If you feel it is a bit too much to tackle, no worries – any competent tile or handi-person can handle without an issue.
Working with Versacork Mosaic:
Installation of the Cork Mosaic is similar to typical ceramic or mosaic tile installation using the glue then grout method. The existing substrate should be clean, including complete removal of old adhesives, loose or weak concrete, dirt, debris, and any other contaminant that may impact the bonding of the cork mosaic Professional installation is recommended for those who have limited DIY skills.
 SUBFLOOR: Versacork Mosaic can be installed on concrete, tile backers, or plywood.
Concrete must be fully cured and smooth. Surface may need to be etched to enable a solid bond between the adhesive and cork.
Plywood needs minimal flex, no less than 1” thick over joists spaced a maximum of 16” on center.
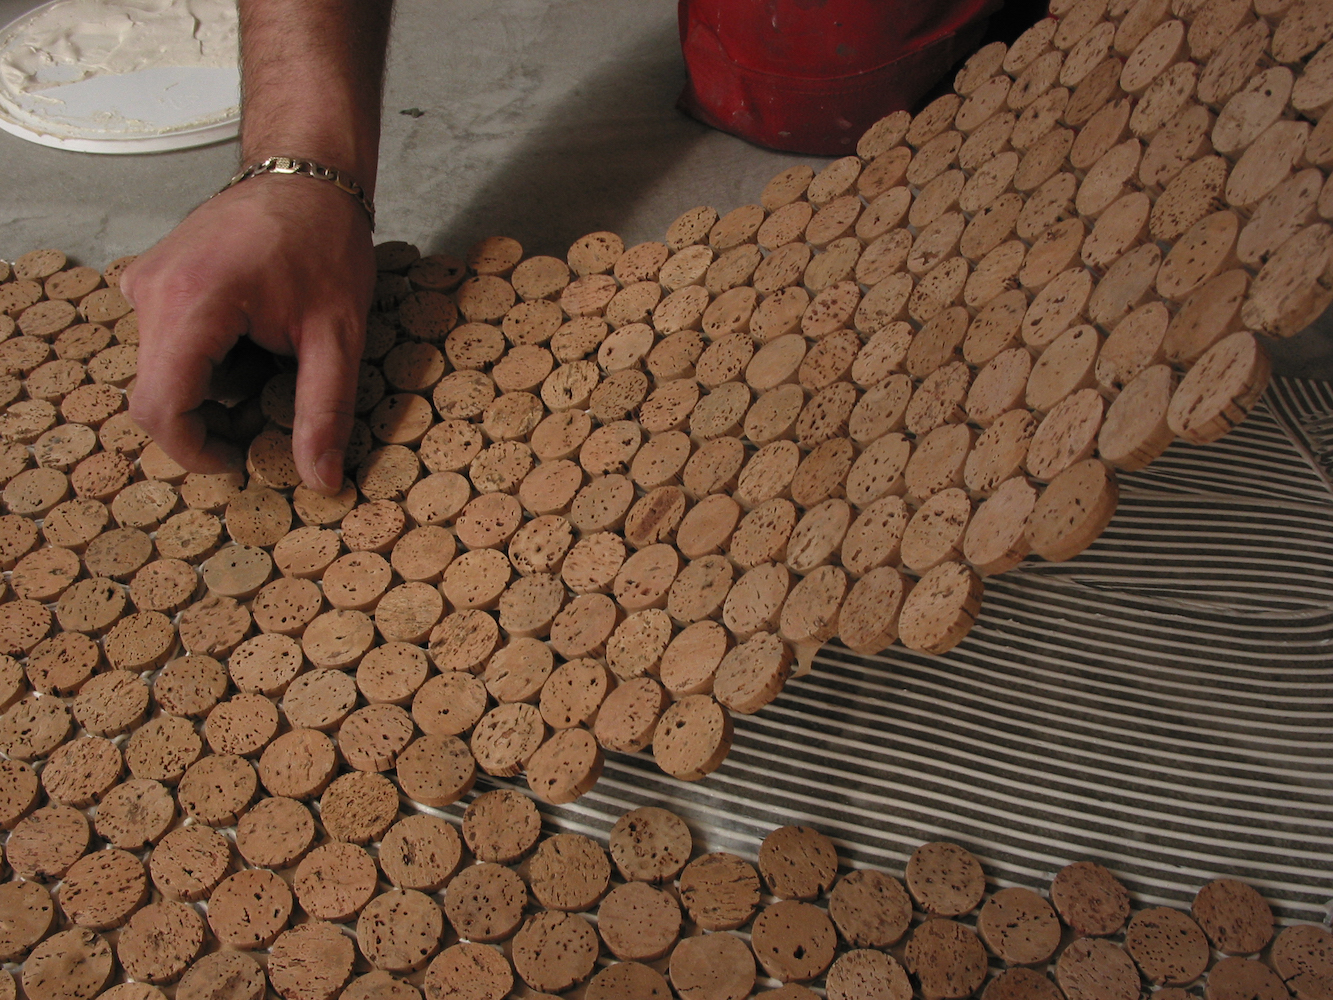
DRY LAY: Lay cork mosaic sheets on subfloor where they will be affixed. Make your appropriate cuts and get everything lined up prior to applying adhesive.
Remove cork mosaic sheets from subfloor and  spread evenly a urethane enhanced adhesive on the prepared substrate according to manufacturer’s specified instructions. We highly recommend Ultra Set Advanced for (wet applications) or Premium Mastik (dry applications) by Bostik.
NOTE: Versacork Premium Prefinished Mosaic will have a fiber glass mesh backing on the bottom of the sheet. Versacork Premium Unfinished will have a plastic film on the top of the sheet where discs are set directly into the adhesive.
Carefully place cork mosaic sheets into adhesive with even pressure to ensure they are level and get a solid bond with adhesive. Make sure each cork disc is firmly embedded in adhesive, paying strict attention to working with the “open time” of the adhesive used. Allow adhesive to fully dry per adhesive manufacturer’s instructions. Not allowing time for adhesive to dry can trap moisture beneath cork can create adhesion/rotting problems.
(Improper adhesion is NOT a product failure)
(Note: If you are installing PREFINISHED product, skip to instructions on  grouting.)
If installing UNFINISHED product and staining (optional), remove plastic film from the top of the discs. To stain cork mosaic you must first start with “unfinished” discs, by purchasing unfinished product. Apply a water-based wood stain (Minwax , Bona Kemi, etc.) as per manufacturers’ spec s. Then apply at least 2 coats of water-based polyurethane (Bona Kemi Traffic is highly recommended) prior to grouting product.
If you are installing UNFINISHED product and not staining, after you remove plastic film will apply at least 2 coats of water-based polyurethane (Bona Kemi Traffic is highly recommended) prior to grouting product.
 Apply a urethane or silicone enhanced sanded grout with a rubber trowel, making certain that all joints are filled. We highly recommend StarQuartz QuartzLock2 or Starglass pre-mixed grout by Bostik to help with ease of installation, though traditional sanded or epoxy grouts also work. (Note: Improper application of grout is NOT a product failure. If standard grout is not mixed properly can cause gaping between cork and grout). The finished joints should be uniformly smooth, without any voids or low spots. Remove the grout off the top of the cork within 5 to 10 minutes to prevent the grout from drying on top of the cork. A commercial tile sponge, first abrading the surface with rough side of sponge and cleaning off grout with smooth side of sponge tends to work well.
 Allow the grout to cure completely (could take 3-4 days). If installing in a residence, the installation is complete at this point. If you are installing in a Wet Application (residential or commercial) or heavy Commercial Applications, finish the installation by evenly applying 2 to 3 additional “thin” coats of water-based polyurethane to seal the floor together (2-3 thin coats is better than 1-2 thick coats). We recommend a 2-component wood sealer/finish (such as Bona Kemi Traffic); 2-component finishes are more durable than single component ones and will last longer in between finishes.
For questions on finish or to locate a distributor, please contact Bona at www.bona.com or 877-289-2662.
 Cleaning: Sweep or vacuum floor frequently to avoid build-up of abrasive particles. Depending on application, regularly dry mop the floor surface to keep the floor surface free of dirt and grit. Use a WELL wrung out damp mop in conjunction with a high ph balance cleaner, such as Bona Hardwood Flooring Cleaner or Simple Green. If the cleaning solution you are using does not evaporate within minutes, you are using too much.
Wet Installations: In wet installations (such as showers, spas, pools, and countertops) it is important to ensure that cork material is protected by urethane, and it is therefore recommended to check floor/surface regularly to make sure urethane is on cork. This is a common practice for similar products like natural stone, and will help ensure a beautiful, long lasting installation. Application of finish should be followed by finish manufacturer’s installation instruction, and should be repeated as often as necessary to protect cork. As with any natural product where finish is applied, failure to maintain the finish could result in irreparable damage. One maintenance step that can be taken to clean and build finish at same time is use of Bona Kemi Hardwood Floor Refresher. Cleaning with this product on a regular basis will help build up finish and allow for need to refinish floor less often.
Furniture and heavy objects (if applicable): When furniture and heavy objects are placed on Versacork Mosaic, foot pads are recommended to prevent indentations in the tiles.